Fonts!
Why are fonts still and issue in a PDF workflow?
During early days of PostScript printing, we only had to deal with Type1 and True Type fonts. Now we have multiple master fonts, fonts for home use, fonts for web use and fonts for printing among others.
When creating a document in a page layout program (Indesign or Quark, not Microsoft Word or Publisher), the operator must be aware of the fonts installed on their computer. If the document is to be opened on a different computer the “identical” fonts must also be installed on the other computer. Even though Macs and PCs have gotten closer together we still experience cross platform issues with fonts. Then there is the issue of embedding the font when creating the PDF and what’s up with some font embedding and some fonts not embedding?
Well not all fonts are created equal. Not to mention names but, SF fonts are intended for web only and/or home use and will not embed when the operator creates the PDF. Fonts acquired as a throw in with some applications are not intended for print use. Ornamental fonts on Christmas or Birthday cards are cute and cool, again they were not created for high-resolution printing. Other reasons for fonts not embedding include having the screen font installed without the bitmapped or printer font. Corrupted fonts may also not embed.
So how does a prepress operator guard against providing their print provider with a PDF that has all of the fonts embedded. In the case of GDI we provide PDF Job Setting files on our website http://www.graphicdevelopments.com/home/downloads.html. Using our job setting file will insure that all embeddable fonts will be embedded.
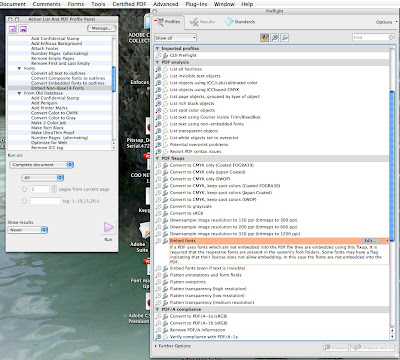
Now that we think we have created a good PDF how can we check it to make sure all the fonts are embedded? If you are lucky enough to have Enfocus Pitstop, you can check and embed or replace any font that Pitstop deems not embedded. For those of us that live in a more frugal world, Acrobat Pro has a built in feature in it’s preflight utility that allows the user to embed fonts. To access the Preflight Utility go to Advanced-Preflight. However, you will have to look at the preflight report if you want to make sure all the fonts did get embedded. See the screen shot below:
Last but not least, GDI does have Pitstop and a great workflow that allows us to embed fonts at the preflight stage or at the ripping stage of document processing. That requires a little extra effort on our part, but if our customer can’t make the file work we can. And we provide this service free of charge and in most cases transparent to our customers.